
 Navigating the “Shared with me” portion of your Google Drive can be a tricky and time consuming process. You can add files that another user has shared with you to any of your folders in "My Drive" making it that much easier to keep track of your documents. Using these quick tips will save you much time and many headaches, as this tutorial walks you through how to add files & folders from “Shared with me” to “My Drive”. For a video tutorial, click here.
Step 1: You’ll want to create some new folders in “My Drive” to hold the files you are about to move from “Shared with me”. Make sure you are in “My Drive”, then click “New” and “Folder”. Create as many folders and subfolders as needed to house your “Shared with me” documents.

Step 2: Click on “Shared with me” to find all of the files and folders that others have shared with you.

Step 3: If you are in “Grid View”, switch to “List View”. List view is much easier to navigate in Google Drive. Click on the icon that contains 3-lines at the top right of your screen to switch to list view.

Step 4: The easiest way to add the “Shared with me” document to “My Drive” is to simply click and drag the file into the “My Drive” folder you created on the left of your screen. Your My Drive will automatically expand when you drag the file to the left of the screen and all of your folders and subfolders will appear below “My Drive” on the left. Drag and drop the “Shared with me” file into the correct folder.

Alternate Method - Here is another way to add files from “Shared with me” to “My Drive”.
Step 1: Navigate to the “Shared with me” portion of your Google Drive. Next, right click on a file. Then click “Add to My Drive”.

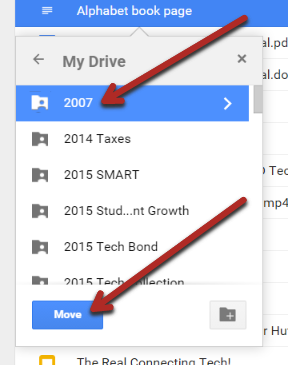
Step 2: Click “Organize” to select the specific folder in your “My Drive” of where you want the file to be located.

Step 3: Select the folder you want, then click the “Move” button.
Video Tutorial:


Then all that was left to do was roll it down the hallway, make a sharp left turn, roll it trough small doorway, and set it down (the opposite of how we lifted it). low cost long distance movers
ReplyDeleteLulubox Download offers patches similar to SB Game Hacker and Lucky Patcher, which change the way the game works. It gives you a catalog of patches for a variety of games.
ReplyDeleteI find it helpful that this tutorial explains how easy dragging and dropping files can make organizing shared documents.
ReplyDelete3A6688417B
ReplyDeleteTakipçi Satın Al
3D Car Parking Para Kodu
Online Oyunlar
Pokemon GO Promosyon Kodu
Hay Day Elmas Kodu