

Showing posts with label Google Sheets. Show all posts
Showing posts with label Google Sheets. Show all posts
Friday, March 16, 2018

Friday, May 6, 2016

More than just a grading tool, Flubaroo also:
- Computes average assignment score.
- Computes average score per question, and flags low-scoring questions.
- Shows you a grade distribution graph.
- Gives you the option to email each student their grade, and an answer key.
- Lets you send individualized feedback to each student.
Below is the text based tutorial on how to use Flubaroo from Flubaroo.com:
Step 1: Create an Assignment
| Sign into your Google docs account, and create a new "Form". Forms are multiple-choice style surveys that you can share with anyone (e.g. via email). Every time someone fills out the form, their responses are placed as a new row in an accompanying spreadsheet. |

Once you've created a new form, just add in the questions for your assignment, and choose "New Spreadsheet" as the destination.
Be sure to include a couple questions that will allow you to identify the student (such as first name, last name, and student id). If you want to email each student their grade, be sure to also include a field for their email address.
Once done entering questions, save and close the form.
|

Step 2: Create an Answer Key
Step 3: Assign It!
Open up the form as a student would, fill it out with the correct answers and submit it. Be sure to enter your name too, so you can identify this entry later on as the answer key. To get to the live form, you can click the "View Live Form" button in the form editor, or choose "Form > Go to live form" from within the destination spreadsheet. |
Step 3: Assign It!
Post a link to the form on your class website, or email the link to your class. As students submit, their responses will show up in the spreadsheet, which will look something like this: |
Step 4: Grade It!
Step 5: Review the Grades
| Open the spreadsheet associated with the form. From the "Add-ons" menu, click "Get Add-ons". You'll be presented with the Add-Ons store, where you can find and install a number of useful Add-ons. To install Flubaroo, type "Flubaroo" in the search box at the top, or select the "Education" category from the drop-down on the left. Once you've found it, click the blue "+ FREE" button.
Once installed, you'll see a new menu called "Flubaroo" underneath the main "Add-ons" menu. If you're ready to grade, just select "Grade Assignment" in this menu.
Once answered, Flubaroo will grade your assignment. This process should take less than a minute.
|


The grades created by Flubaroo will be located in an adjacent worksheet called "Grades", as shown:
For each submission, Flubaroo will show which questions were answered correctly ("1" point"), which incorrectly ("0" points), and which were not graded. If less than 60% of students got a question correct, the question will be highlighted in orange to alert you. Additionally, students who scored less than 70% on the assignment will be highlighted in red.

The Flubaroo menu will now offer you the ability to email each student their grades, view a summary report, or regrade the assignment. You might want to regrade the assignment if more students submitted answers, or if you want to throw out a question that most students got wrong.

If you choose to email each student their grade, you'll be given the option to include an answer key in the email. You can also include a short message to your students. The email sent to each student will include their total score, and their score for each question. Note: You will only be able to email students their grades if the original assignment had a question asking them for their email address.
Choosing "View Report" shows you a summary report of the grading. The report includes the distribution of grades (a histogram), and a button to email yourself a copy of the report.
 Want to try it out? Click the button below to try it on a sample assignment. Remember, Flubaroo is free to use!  |
Friday, April 15, 2016

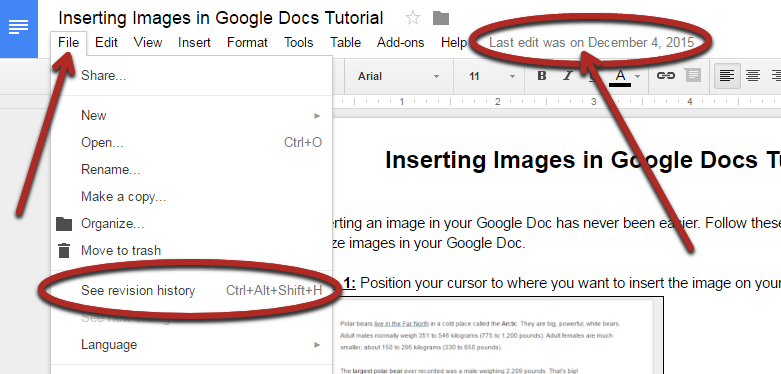
Step 1: Open up your Google Doc, Google Sheet, Google Slide, or Google Drawing. Then click File > See revision history. You can also click the grey text to the right of “Help” to access revision history.
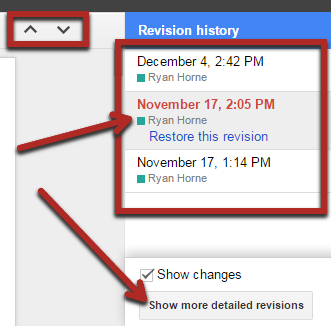
Step 2: Click on a timestamp on the right to view a previous version of your file. To open up more timestamps click show more detailed revisions. Text that was deleted will be shown with strikethrough. Text that has been added will be highlighted in a different color. Click the arrows to scroll through the list of changes.
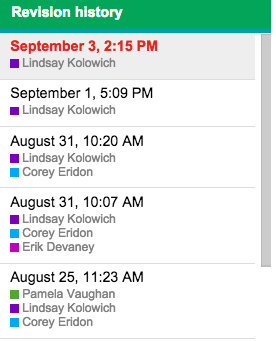
Step 3: If your document was a collaborative document, you will see who edited by matching the color of text to the color next to the user's name.
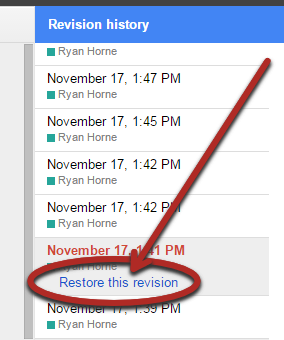
Step 4: To revert back to a previous version simply click where it says Restore this revision in blue text.
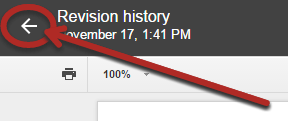
Step 5: If you wish to exit revision history without making any changes, click the white back arrow on the top left of your screen.
VIDEO TUTORIAL:
Thursday, March 17, 2016

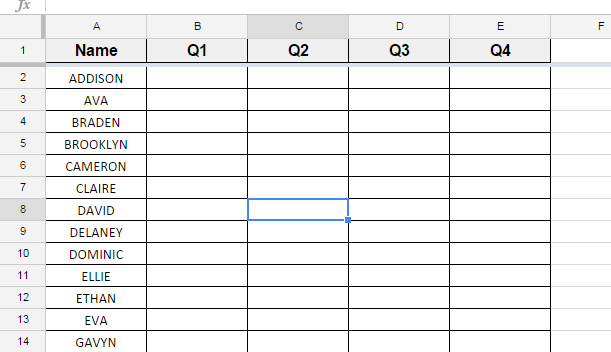
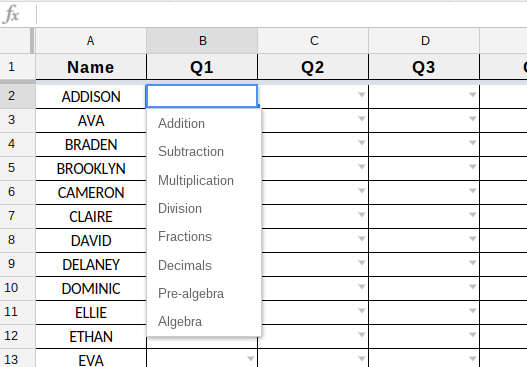
Step 1: First, create your Google Sheet, setting up all of your cells. Leave the cells in which you would like the drop down arrows to appear blank cells for now.
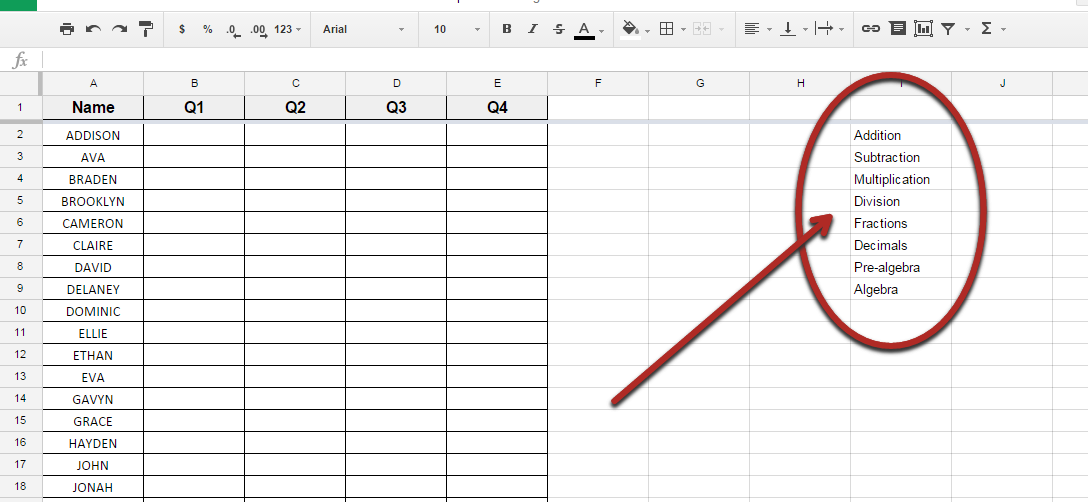
Step 2: Next, create your list of terms that you would like to appear in the drop down list(s). Create more than one column of terms if you want to have different selections for different cells.
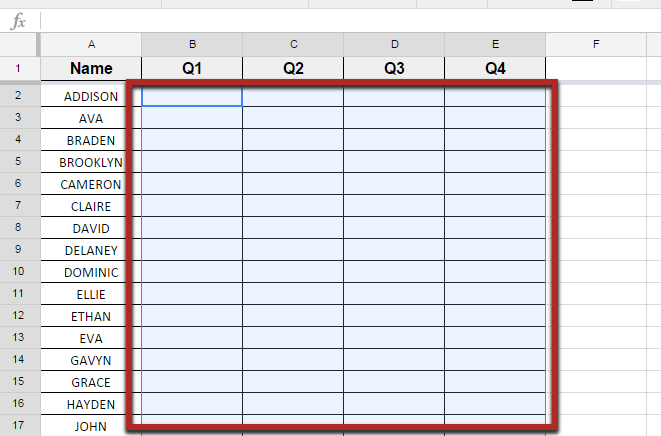
Step 3: Click and drag to highlight all of the cells that you would like to have dropdown arrows added to.
Step 4: Right click and select “data validation”, or click “Data” on the Menu bar and then select “Validation”.
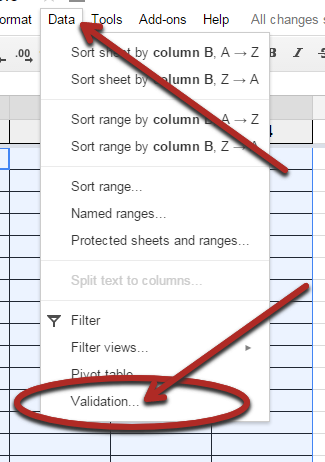
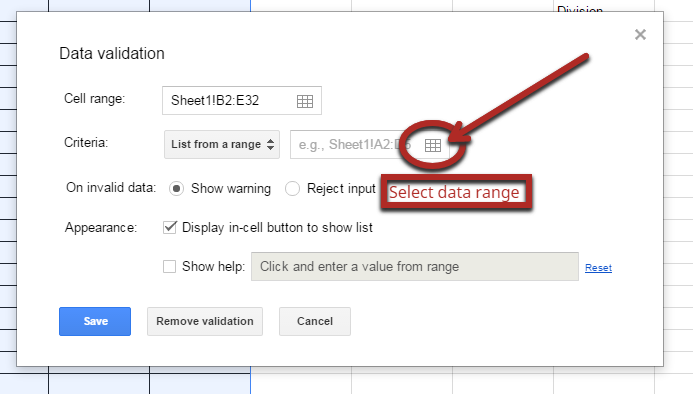
Step 5: click the array of 9 empty cells button to select your data range.
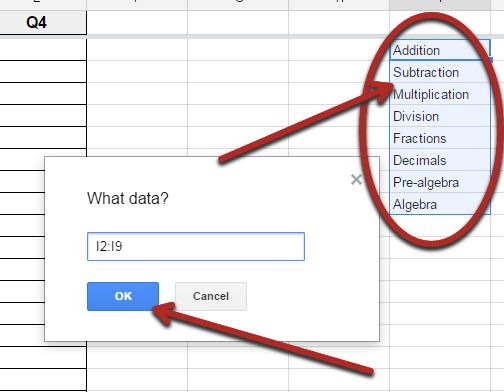
Step 6: Now, click and drag to highlight the list of terms you wish to appear in your dropdown arrow. Then click “OK”.
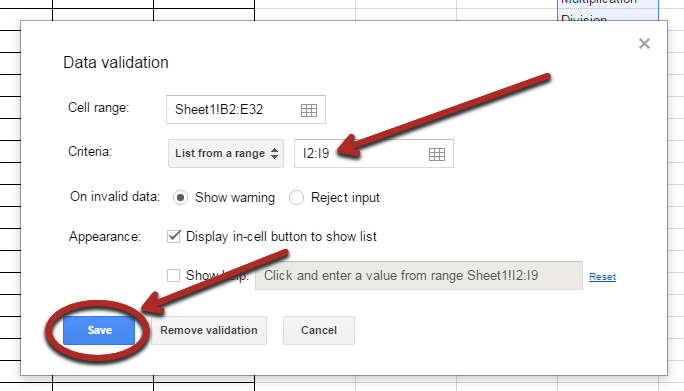
Step 7: Your data range is now automatically entered. Simply click “Save” to have the dropdown arrows inserted.
Step 8: Your dropdown arrows will now work!
Video Tutorial:
Friday, February 5, 2016
 One of the benefits to creating Google Docs, Slides, & sheets is the ability to share your work. Once you share your documents, you can collaborate with others on the same document both synchronously and asynchronously. Sharing with Google Apps makes it so easy to collaborate; no more confusing emails with attachment after attachment. This tutorial will show you how to share a Google Doc, Slide, or Sheet with another Google user.
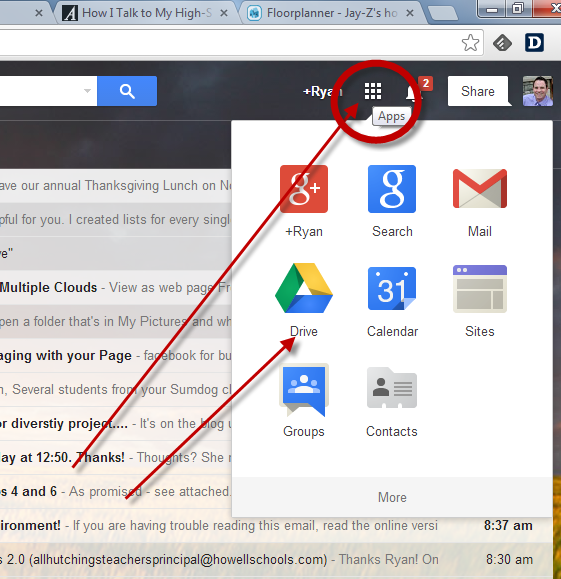
Step 1: Login into your howellschools.com email account and then click the “Apps” button. Next, click “Drive” on the top of your screen to open up a new tab that shows the contents of your Google Drive.
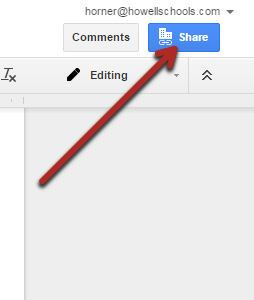
Step 2: Open the google Doc you would like to share. then, click the “Share” button on the top right of the screen.
Step 3: (1) Enter the name of who you want to share our Google Doc with, (2) select the editing rights you want give*, (3) click “Done” to send the Google Doc.
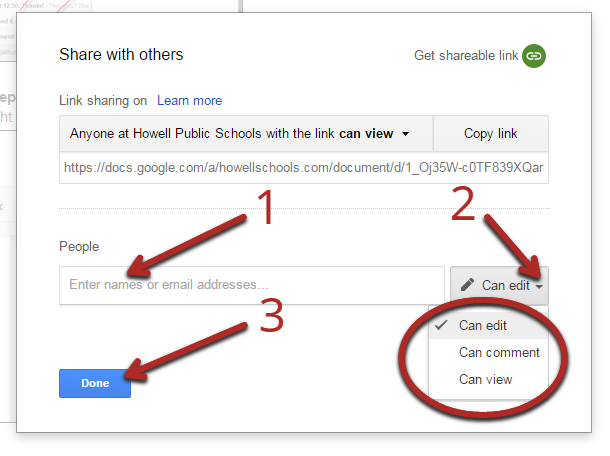
*“Can edit” gives everyone who has access to the Google doc the rights to add or delete anything to your document. “Can comment” allows the user to leave comments on your document, but does not give them the rights to add or delete any text. “Can view” lets the user view and print your document with no editing or commenting rights.
Subscribe to:
Posts
(
Atom
)
Popular Posts
-
 People have completed your Google Form and now you have a beautiful summary of responses with graphs, charts, and a scrolling window for...
 -
 You found that perfect YouTube video for your students, however, you feel nervous to show the video because of the inappropriate comments ...
 -
 One of the best features of Google Classroom is the ability to push out templates that you have created so that each one of your students ...